SpinoInWonderland
Hatchling


Posts : 88
Reputation : 7
Join date : 2016-06-09
 | Subject: Multiskinning tutorial by Docszoo  Mon Aug 15, 2016 10:59 am Mon Aug 15, 2016 10:59 am | |
| Another one from Modding Genesis. - Docszoo wrote:
- If you allready know how to put skins in game, skip down to the big bold letters.
SUGGESTED TOOLS: HxD, ConvertCCT, and DDS Converter 2.
Now, as you all may know, multiple skinning can prove to be difficult, even if you follow all of ERC's Multi-skinning tutorial. One of the things that most frustrated me was when I would continually add blank skins so that I could put a new skin in-game, and the skin would show up blank (or white). This tutorial gives you an alternate route to receiving the correct skin types.
Warning: This, like all multi-skinning, gets rid of the dead skins. In other words, the dead skin will look white.
To start out, you must know the basics of how the TML is set up. There are about 19 parts in an unmodded TML file:
The HeaderThe # of skins(usually labled 06)The 3rd dinosaurs dead skin header](usually labled 05)The 3rd Dinosaur's Dead Skin ThreadThe 3rd dinosaurs live skin header (usually labled 04)The 3rs Dinosaur's Live Skin ThreadThe 2nd dinosaurs dead skin header(usually labled 03)The 2nd dinosaurs dead skin threadThe 2nd dinosaurs live skin header(usually labled 02)The 2nd dinosaurs live skin threadThe 1st dinosaurs dead skin header(usually labled 01)The 1st dinosaurs dead skin threadThe 1st dinosaurs live skin header(usually labled 00)The 1st dinosaurs live skin threadNumber of listed dinosaur names(usually 03)Dinosaur 1's NameDinosaur 2's NameDinosaur 3's NameFooter.
Here it is, in picture form. Notice that there are not just 3 types of dinosaurs, but 7 skins. This one has been modyfied. Use your best judgement on unmodified ones.


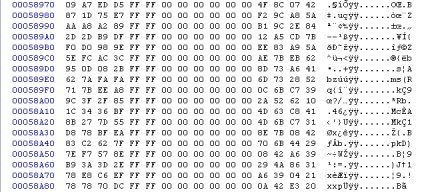


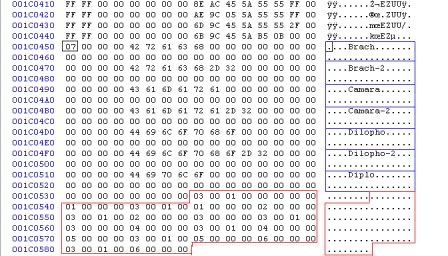
All the colored parts are the important parts of what you mess with. Also, if you take care to notice, everything is color coded to match the sections at the top. Colors were matched to the best of my ability, but you should excuse my colorblindness if it is messed up. As you have probably known, the tml is extremly long. In the pictures above, I have shortened it so as to show the important parts, and what the different sections look like. Between all the headers, you will see a list of ÿÿ's as you quickly go down the list. Notice how they are the same in each skin thread (the same colums), but has different position on different skins. Use this when scrolling through the skins code to find the important parts.
Once you have figured out there is actually very little data to truly mess with, putting skins in-game becomes easy, and multiple skins becomes understandable.
So, you wanna new skin for a new dinosaur huh? Well, you must do some things first.
On the 3 dinosaur names, you must make the dead skin seperate from the live skin. You do this by copying the existing name, and paste it under it. Instead of having just the dino's short name, insert a 2 after the name. Make sure you do not ADD a 2, but replace the end with a 2. This means instead of having two period after the dinos name, you have a -2. If you have 4 periods after a dino’s name, it will have a -2 and the two period. For example, a modyfied Morrison B tml should look like this:
....Brach...........................Brach-2........................Camara........................Camara-2.....................Dilopho........................Dilopho-2..................
*do not copy that: it has the wrong amount of periods. Remember, the data goes by 4's.*
Also, if you notice, all the names have 4 periods before each name begins. You MUST remember to make them either four periods from the start, or eight. All of them must be constant. I have told people this countless of times, and it is one of the most common mistakes people make.
You got this far, but the tml STILL does not work. That is because you need to change the Number of listed dinosaur names(usually 03) to a 06. In the image, it is in a black box. change it from 03 to 06.
Now, the tml should be ready for multi skinning.
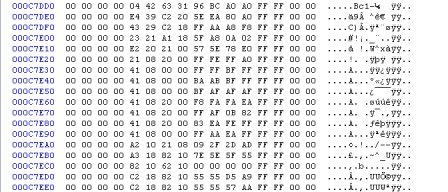
Ok, so you got this skin that you put into the dds converter. You open it in the hex editor (in a new tab, and it is JUST the DDS), and you see the letters DDS at the very start of the long coding. This is the start of the skin THREAD. Everything before this:
....€..........B......ÿÿ..C.
is the header data. [Look at the blue parts of the picture] Since this part is missing from your newly developed DDS, you must locate it’s corresponding dinosaur’s header data from the tml. It must be from the live skin (if you are making a live skin). So, go and find that part. Do find it easiest, what I like to do is to go to SEARCH > FIND. Type in "DDS". It will bring you to the first one, which happens to be the dinosaur 3's dead skin, right next to the header data of the TML. Use the next button. You will find another “DDS” set of letters. This is dinosaur 3’s live skin. If this is your model, copy the header data, and paste it before the DDS on your new skin’s DDS. If dinosaur 3 is not the dinosaur you want, keep searching for the live skin of that model (use the list provided). Once the header is found and inserted (not deleting any data of the DDS), copy your WHOLE DDS data set (right click > Select all), and paste it before the dead dino’s skin header. There. You have just learned the hardest part about multiple skinning.
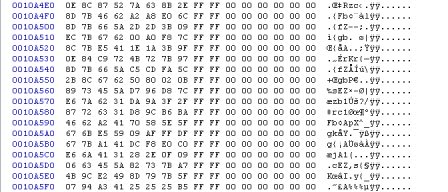
Now, for the finishing touches. As you know, the list of dinosaur threads is backwards from the dinosaur lists at the footer. So, placing the skin before skin "05" means this skin is skin "06". This is the number your replace the 05 with. Then, go down to the footer, and copy that live skins name (the 4 dots before, the name, and dots after it, and the line below that) and paste it without replacing other data as the last skin on that list. For example, it should look like this:
....Brach...........................Brach-2......................Camara.......................Camara-2..................Diloph......................Diloph-2............... ....Diplo.......................
So, be it a new dinosaur, or a new skin for an old dinosaur, replace the name with the new one (do not erase anything; you must keep the same amount of periods). So, lets say your new dino's name is Diplo, short for Diplodicus. You notice that Camara and Diplo does not have the same amount of Letters. Since you must keep the same amount of data, find the number of extra letters in the original skin name (which in the example is 1 extra letter in camara). Copy and INSERT one period after the end of the new name. You have the name of your new skin. However, that is not all.
Remember when you put a 2 after every skin? There was a number changed in the amount of listed skin (from 03 to 06). To cope with the new skin, replace that 06 with an 07 at the header area of the tml. Do the same for that total number of skins (from 06 to 07) at the footer right before the dino list. These are both black squares on the picture.
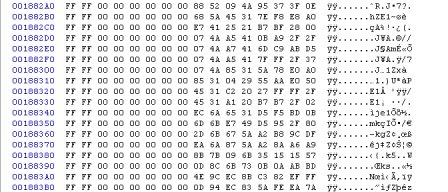
Ok, one more step, and then you are done with adding the new skin. Copy and replace the following data with the old footer (find the first number , which comes 4 periods (or 00's) after the first letter of the last skin):
- Code:
-
03 00 01 00 00 00 00 00 01 00 00 00 03 00 01 00 01 00 00 00 02 00 00 00 03 00 01 00 02 00 00 00 03 00 00 00 03 00 01 00 03 00 00 00 04 00 00 00 03 00 01 00 04 00 00 00 05 00 00 00 03 00 01 00 05 00 00 00 06 00 00 00 03 00 01 00 06 00 00 00
ERC somehow made this work. Don't ask me how she did, but this will always be needed for any multi-skin, no matter the number. This set happens to be for 7 skins.
This seems all good and dandy, but what if you want to add more than just 7 skins? Well, besides the number totals, the only thing needed to be changed (or in this case, added) is the footer.
There is a simple way of determining what do do. Look at the following from the previous footer:
- Code:
-
05 00 00 00 03 00 01 00 05 00 00 00 06 00 00 00 03 00 01 00 06 00 00 00
Notice a pattern? Well, you better. It begins with 05, and three 00's. Then, an 03 00 01 00. Then it repeats the first part. Now, look at the remainder. The only difference is a 6 rather than a 5. There is the secret to making 7+ skins on one tml. However, when you get to 10 skins, you do not put the total as a 1-0. You put it as a 0A for 10 skins, and a 0B for eleven skins.
Once you pasted that in, you are done with the tml. Add all the NWT, INI, and INX files with the new skin's info, and add the new skin's data to the eng.txt in the GUI. Open the game, and test him out.
[size=200]HERE IS WHERE THE SKIN REASSIGNMENT BEGINS[/size]
So, you open the game, all excited to see your new creation. You put in a hatchery, flip through the dinosaur's, and you find this blank (white) model where your new dinosaur is suppose to go. Just so you know, this happens to EVERYBODY. ERC suggests adding new blank skins to get this to work. Personally, it helps only every now and then. What I do is something a little different.
The skin listing: It shows the order of the skins backwords, according to the placement of the dds skin information. However, the dead skins, once added a 2 to every one, are not non-existant. The game does not properly recongize them. This can be looked at in two ways:
1. I can't see the zomby looking body any more, oh noes...
2. Hey, since these slots are now dead, maybe re-ordering the skins will make my new one come alive!!!
Personally, I don't care much for that "living dead" cheat. Who cares about dead skins when you can have new live ones!
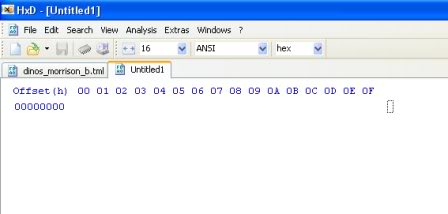
If you are using HxD, you will notice that there are tabs in the top near the menu bar. Click file, and press new. You will go to a screen which you see no data. It should look like this:
Click your tml file. Go to LIVE-Skin-Header #3. Copy EVERYTHING before this skin's number
to the number of your DEAD-Skin-Header #3.
Go to your new tab, right click and press paste insert. All of the letters should look red.
When you are still on that new tab, click File > Save as. The name should be Untitled 1. Erase that and lable it DEAD _______(put the dinosaur's name there). There, now you will allways have a backup of this dinosaur's skin.
Go back to the tml, right click on your highlighted part. Press cut. This will make it easier on you when you are trying to copy and paste everything out of the tml. I call this dissecting the tml.
Press File > New. Again, you should see a new tab. This should be called "Untitled 3".
This time, go to DEAD-Skin-Header #2, and copy everything before this skin's number, until you reach the LIVE-Skin-Header #3. Copy all that, and paste it into the newest tab. Press File > Save as, and call it LIVE_______(put the dinosaur's name there). Go back to the tml and cut the highlighted part.
Do this for EVERY SINGLE skin.
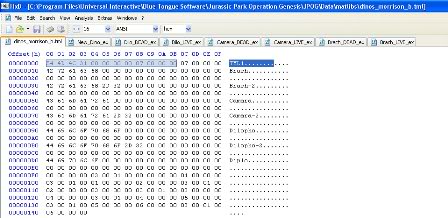
Once done, your original tml should look like this, with ALL the skins as tabs.
With tmls, the dead skin usually comes before every live skin. For this example, since Dilpo is fairly far off from it's dead counterpart, you will need to reange the tml. Open a new tab. Copy the original header data and total # of skins from the original tml and paste them onto the new tab.
Now Go ahead and copy/ paste the first tml (the LIVE-BRACH) as it would normally occur. The number of it does not need to be changed. Do the same for it's dead skin. This number does not need to be changed either.
Copy and paste the new dino's tml. On it's header, it should say "06". Put a 2 instead of the 6. Remember this order.
Copy and paste the live skin of this dino next (in other words, above this new skin). Rename it 03 instead of 02, because the new skin is taking up that slot.
Do this for EVERY skin, renaming and pasting above.
Once done doing this, go to the original tml and copy/ paste the footer onto the bottom of your new tml. However, this order has been switched. Instead of:
....Brach...........................Brach-2.........................Camara..........................Camara-2........................Dilopho.........................Dilopho-2.......................Diplo...........................
it should look like:
....Brach...........................Brach-2.........................Diplo...............................Camara..........................Camara-2........................Dilopho.........................Dilopho-2...................
Once this is done, open up the game. Look at where you put the dinosaur. If it is still white, move the dinosaur to a different spot, using the same procedure.
If it worked, and every other skin came up correctly, you have succeeded.
 _______________  deviantART: http://spinoinwonderland.deviantart.com/ deviantART: http://spinoinwonderland.deviantart.com/
Blog: http://sauropodomorphlair.blogspot.com/ | Imgur: http://spinoinwonderland.imgur.com/
Models | Skins | Mesozoic Revolution | |
|
JP_Dino_Hunter
Embryo


Posts : 13
Reputation : 0
Join date : 2018-07-06
| | Subject: Re: Multiskinning tutorial by Docszoo Thu Oct 18, 2018 7:19 pm | |
| I don't understand the highlighted light green hex and what it represents.
Also, the footer...can someone explain that to me because I can't continue to multi-skinning without understanding those two parts. | |
|